Marathon Build Guide: The Best Shell Loadouts for Surviving and Winning More Fights
This Marathon build guide exists because most new players build wrong — and pay for it with their loot.
You survived your first 20 hours, learned how to extract, and now face the part that separates average players from dangerous ones: your loadout.
Here is the truth most guides will not tell you: a good build in Marathon is not about spending the most credits. Instead, it is about spending credits on the right things. Meanwhile, most beginners get this exactly backwards.
If you have not read our beginner fundamentals yet, start with our Marathon beginner guide. Then come back here to optimize your gear.
1. How Marathon Builds Actually Work
Before we get into specific builds, you need to understand how gear works in Marathon. Otherwise you will just be copying loadouts without knowing why they work.
To start with, every build has four layers.
| Layer | What It Is | Impact |
|---|---|---|
| Shell | Your class — determines HP, speed, ability | Foundation |
| Weapon | Primary + secondary — defines your fight range | High |
| Armor | Damage reduction + special resistance | Medium |
| Utility | Grenades, medical, special items | Situational |
The golden rule of this Marathon build guide: your Shell and weapon must agree. A close-range weapon on a low-HP Shell is a donation, not a build. A sniper loadout on a Shell with no escape ability gets you killed the moment you miss.
Match the tool to the task. Always.
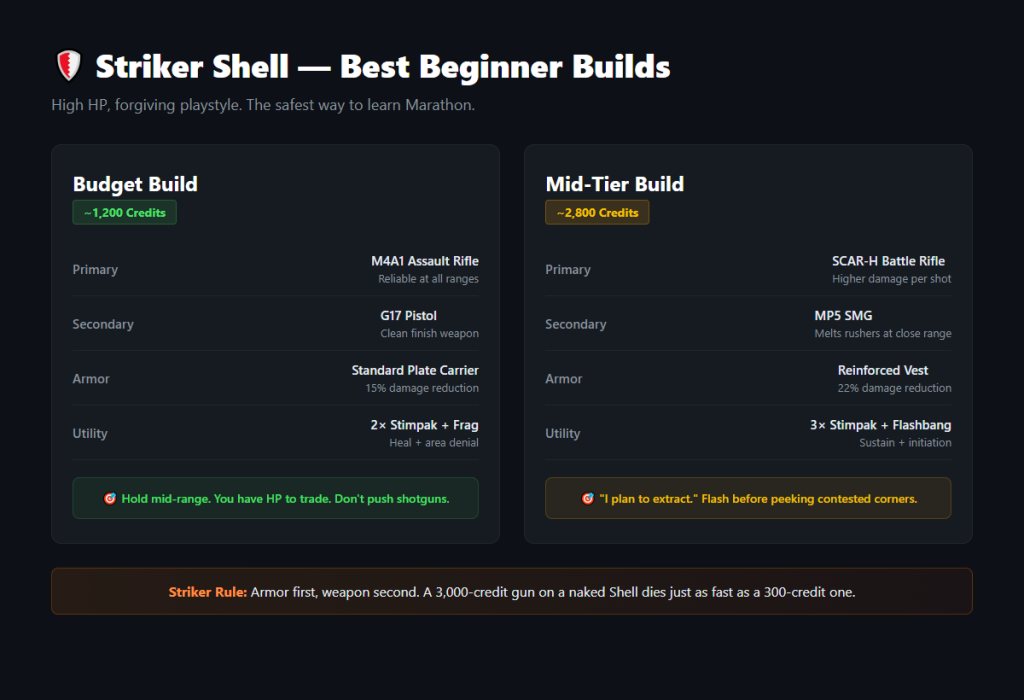
2. Striker Builds — The Survivor’s Choice
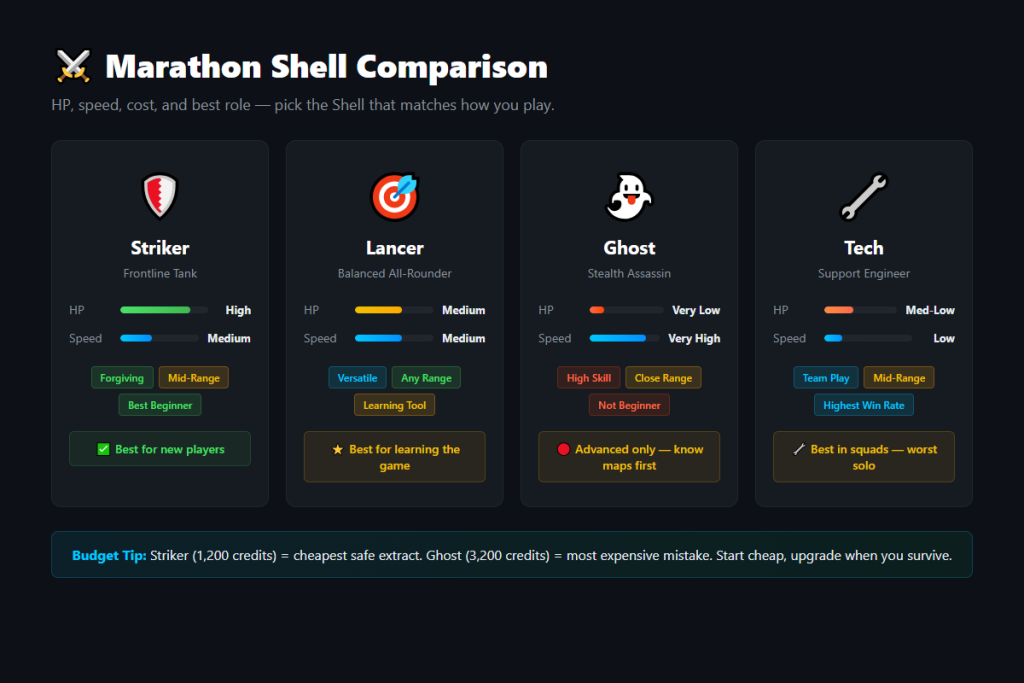
Striker is the most forgiving Shell in Marathon. High HP means you survive mistakes that kill other classes. For beginners, this is your home base.
Budget Build (~1,200 credits)
| Slot | Item | Why |
|---|---|---|
| Primary | M4A1 Assault Rifle | Reliable at all ranges, easy recoil |
| Secondary | G17 Pistol | Clean finish weapon, low ammo cost |
| Armor | Standard Plate Carrier | 15% damage reduction |
| Utility | 2× Stimpak, 1× Frag Grenade | Heal + area denial |
How to play it: Hold mid-range angles. Thanks to your high HP, you can trade shots effectively. However, do not push into shotguns — Striker is tough, not invincible.
Mid-Tier Build (~2,800 credits)
| Slot | Item | Why |
|---|---|---|
| Primary | SCAR-H Battle Rifle | Higher damage per shot, manageable kick |
| Secondary | MP5 SMG | Close-range backup, melts rushers |
| Armor | Reinforced Vest | 22% damage reduction |
| Utility | 3× Stimpak, 1× Flashbang | Sustain + initiation tool |
How to play it: Consider this the “I plan to extract” build. The SCAR-H wins mid-range duels reliably, while the MP5 punishes anyone who pushes you. Additionally, always flashbang before peeking contested corners.
3. Lancer Builds — The All-Rounder
Among the four Shell types, Lancer stands out as perfectly balanced — medium HP, medium speed, with no hard weaknesses. Consequently, it is the best Shell for learning how to fight in Marathon because it does not give you a crutch.
Budget Build (~1,000 credits)
| Slot | Item | Why |
|---|---|---|
| Primary | M4A1 or AK-47 | AK hits harder but kicks more — pick your comfort |
| Secondary | M1911 Pistol | Cheap, reliable, gets the job done |
| Armor | Light Vest | 10% reduction, keeps you fast |
| Utility | 2× Bandage, 1× Smoke Grenade | Cheap sustain + escape tool |
How to play it: Think of this as the “I am still learning” build. The smoke grenade is your panic button — use it to break line of sight when a fight goes wrong. Most importantly, do not be a hero.
Mid-Tier Build (~2,500 credits)
| Slot | Item | Why |
|---|---|---|
| Primary | M16 DMR | Precision mid-range, two-tap potential |
| Secondary | UZI SMG | Spray weapon for close emergencies |
| Armor | Balanced Plate Carrier | 18% reduction, no speed penalty |
| Utility | 2× Stimpak, 1× Frag, 1× Keycard Scanner | Sustain + clear + tactical |
How to play it: Lancer with a DMR is a kill-confirm machine. Hold angles at 30-50 meters for best results. If someone closes distance, switch to UZI and spray center mass. Furthermore, the keycard scanner lets you access conditional extracts reliably — which means you survive more.
4. Ghost Builds — High Risk, High Reward
Ghost has the lowest HP in Marathon. You die in 3-4 bullets from anything. On the other hand, you move faster than any other Shell, and your stealth ability lets you reposition without being heard.
Do not play Ghost until you know every map. Seriously. Check our beginner guides for map walkthroughs first.
Budget Build (~1,500 credits)
| Slot | Item | Why |
|---|---|---|
| Primary | MP5 or UZI SMG | Close-range burst, kills before they react |
| Secondary | Silenced Pistol | Quiet takedowns on AI, no map ping |
| Armor | None or Light Vest | Speed is your armor — do not slow down |
| Utility | 3× Stimpak, 1× Motion Sensor | Heal after every hit + wallhack intel |
How to play it: Never take a fair fight. If they see you first, run. Your advantage is positioning, not HP. Additionally, use the motion sensor to know where enemies are before they know about you.
Mid-Tier Build (~3,200 credits)
| Slot | Item | Why |
|---|---|---|
| Primary | Vector SMG | Fastest TTK in the game, melts anyone within 15m |
| Secondary | Silenced DMR | Quiet mid-range picks, no positional reveal |
| Armor | Stealth Suit | Reduces footstep audio range by 40% |
| Utility | 3× Stimpak, 1× EMP Grenade | Sustain + disable enemy abilities |
How to play it: This is the assassin build. An EMP disables enemy Shell abilities for 4 seconds — long enough for a Vector to kill anything. After that, flank, kill, and relocate. Never be where they expect.
5. Tech Builds — The Force Multiplier
Rounding out the roster, Tech serves as the support Shell. You are not the star player. However, a good Tech makes a bad team win anyway. According to the Marathon community on Reddit, Tech is the most underplayed Shell despite having the highest win rate in squad matches.
Budget Build (~1,100 credits)
| Slot | Item | Why |
|---|---|---|
| Primary | M4A1 or SCAR-H | Reliable, consistent, nothing fancy |
| Secondary | G17 Pistol | Backup only — you should not be entry fragging |
| Armor | Standard Plate Carrier | 15% reduction, stay alive to support |
| Utility | 2× Stimpak, 2× Repair Tool | Heal self + repair teammate armor |
How to play it: Stay behind your team. Repair their armor between fights. Shoot only when you have a clean angle. Most importantly, your job is keeping them alive, not getting kills.
Mid-Tier Build (~2,900 credits)
| Slot | Item | Why |
|---|---|---|
| Primary | SCAR-H or M16 | Mid-range support fire |
| Secondary | MP5 SMG | Self-defense only |
| Armor | Tech Vest | 18% reduction + 15% faster ability recharge |
| Utility | 2× Stimpak, 1× Repair Tool, 1× Turret Beacon | Full support kit |
How to play it: The turret beacon turns any room into a death trap for enemies. For maximum effectiveness, place it before reviving a teammate, before looting, or whenever you stop moving for more than 5 seconds.
6. Weapon Tier List for Patch 1.0
This Marathon build guide would be incomplete without ranking the weapons. Based on community data from the Marathon Steam page and Reddit discussions.
S-Tier — Always Buy If You Can Afford
- Vector SMG: Fastest TTK, melts at close range
- SCAR-H Battle Rifle: Best all-rounder, wins mid-range duels
- M16 DMR: Two-tap headshot kills, dominates open sightlines
A-Tier — Strong, Situational
- MP5 SMG: Budget Vector, still very good
- AK-47: High damage with hard recoil — rewards skill
- Silenced DMR: Ghost’s best friend for quiet picks
B-Tier — Decent, Budget-Friendly
- M4A1: Reliable and easy to use, nothing special
- UZI SMG: Good spray weapon for emergencies
- G17 Pistol: Best value secondary in the game
Never Buy
- Pump Shotgun: Too slow — one miss equals death
- Bolt-Action Sniper: Too punishing, a Ghost-only meme build
7. The One Mistake That Wastes Your Credits
Here is the mistake we see constantly, and no other Marathon build guide talks about it:
Upgrading your weapon before your armor.
A 3,000-credit SCAR-H on a Shell with no armor dies just as fast as a 300-credit M4A1. Meanwhile, a 1,500-credit M4A1 with a Reinforced Vest survives twice as long.
The rule is simple: armor first, weapon second. Always.
| Priority | Buy | Budget |
|---|---|---|
| 1 | Armor (at least 15% reduction) | ~600 |
| 2 | Primary weapon (reliable, not fancy) | ~800 |
| 3 | Medical supplies (2-3 Stimpaks) | ~200 |
| 4 | Ammo (one full reload) | ~100 |
| 5 | Secondary weapon | ~300 |
| 6 | Utility (grenades, tools) | ~200 |
Total budget build: ~1,200 credits. Survivable. Effective. Repeatable.
8. How to Test a Build Without Going Broke
New players buy expensive loadouts, die in 4 minutes, and lose everything. Then they do it again. Then they have zero credits and quit.
Do not be that player.
Here is how to test any build safely:
- Run it in Talos Station first — the map you know best. Never test new builds on unfamiliar maps.
- Set a loss limit — for example, “If I die twice with this build, I downgrade to budget for the next three runs.”
- Always insure the expensive piece. You can insure one item per drop. If nobody loots your body, you get it back. So always insure your weapon.
- Record what killed you. After every death, note was it the build or your decision? Be honest. Most deaths are decisions, not gear problems.
For farming credits to fund your testing, see our Marathon farming and economy guide.
Marathon Build Guide: The Bottom Line
You do not need the most expensive build. You need the build that gets you out alive consistently.
New players should run Striker with M4A1 + Standard Plate Carrier. Boring? Yes. But boring extracts. And extraction is the only stat that matters.
Intermediate players, step up to Lancer with SCAR-H + Balanced Plate Carrier. Enough firepower to win fights, enough speed to pick your engagements.
Advanced players can try Ghost with Vector. However — if you are reading a Marathon build guide, start with Striker.
QuickStrats — You Play. We Curate. More Marathon builds coming soon.
Next: Marathon boss and enemy guide — learn every enemy’s weakness and when to fight vs run.