Marathon Map Guide: Every Extraction Point, Loot Zone, and Ambush Hotspot
This Marathon map guide breaks down all 4 maps with extraction points, loot zones, and ambush spots. Knowing a map is worth more than good gear — if you know where to go and where not to go, you extract more often.
Here is a stat that should change how you think about Marathon: most failed extractions happen within 100 meters of an extraction point. Players reach the extract zone, get impatient, push without clearing corners, and die to someone who was already there waiting.
This Marathon map guide exists so you stop losing runs to locations you should have seen coming.
If you are still learning the basics, read our Marathon beginner guide first. If you need to know what enemies guard each zone, check our Marathon Boss & Enemy guide.
1. How to Read a Marathon Map
Every map in Marathon has four layers of information. Most players only see the first one.
| Layer | What It Shows | Why It Matters |
|---|---|---|
| Topography | Buildings, elevation, cover, open ground | Dictates movement and sightlines |
| Loot density | Where high-tier crates spawn | Tells you where players will be |
| AI patrol zones | Where enemies roam and bosses spawn | Predicts where fights will break out |
| Player flow | How real players move from spawn to extract | Shows where ambushes work best |
The first layer is on your in-game map. The other three are in this guide. Check the official Marathon on Steam and Bungie’s Marathon page for the latest map updates.
The golden rule of Marathon movement: the shortest path is always the most dangerous path. If a route looks obvious, someone is already watching it. Use this Marathon map guide to plan routes that avoid obvious chokepoints.
2. Talos Station — The Beginner’s Map
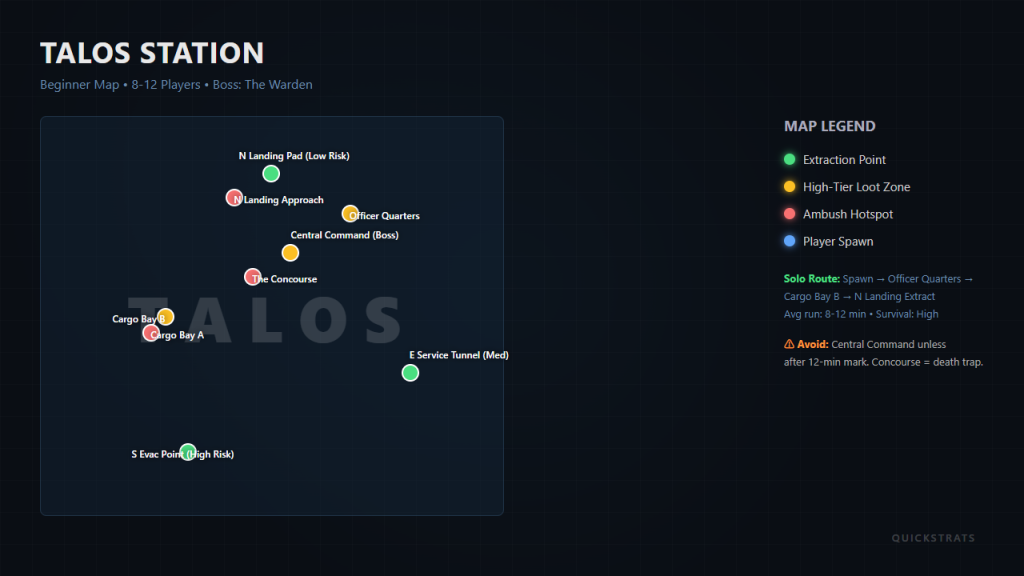
Talos Station is the first map most players learn. Do not mistake “beginner map” for “safe map.” A map full of beginners is a map full of players making noise and attracting third parties.
Map Profile
| Attribute | Detail |
|---|---|
| Size | Medium (roughly 600m × 400m playable area) |
| Player count | 8-12 |
| AI presence | Heavy (Stalkers, Drones, Scavengers, Heavy Gunners) |
| Boss | The Warden (Central Command, spawns at 10-minute mark) |
| Extraction points | 3 |
| Difficulty | Beginner-friendly routes, easy to learn, hard to master |
Extraction Points
| Extract | Location | Risk Level | Notes |
|---|---|---|---|
| North Landing Pad | Northern edge, open platform | Low | Most popular. Wide sightlines let you check for campers before committing. |
| East Service Tunnel | Eastern wall, underground entrance | Medium | Tight corridors. One ambusher can hold the whole tunnel. Clear with grenades. |
| South Evac Point | Southern perimeter, behind the fuel depot | High | Surrounded by cover on three sides. Six common ambush positions. Only use if you have a team. |
High-Tier Loot Zones
| Zone | Loot Type | Risk | Best Time to Visit |
|---|---|---|---|
| Central Command | High-tier weapon crate, Warden loot | Very High | After the 12-minute mark (most players have moved on or died) |
| Cargo Bay B | Rare attachments, medium armor | Medium | Early (first 5 minutes, before rotations converge) |
| Officer Quarters | Keycards, credits, consumables | Low | Anytime. Under-looted because it is off the main path. |
Common Ambush Hotspots
- The Concourse (central hub): Everyone passes through. Never linger. Cross it fast or go around.
- Cargo Bay A entrance: One door in, one door out. A team holding the high catwalk inside controls the entire room.
- North Landing approach: The long corridor leading to the most popular extract. Check every corner. Someone is always there in the last 5 minutes.
Best Route: Solo New Player
Spawn → Officer Quarters (loot) → Cargo Bay B (quick peek) → North Landing Pad (extract). Avoid Central Command entirely. Average run time: 8-12 minutes. Survival rate: high.
Best Route: Team Loot Run
Spawn → Cargo Bay B (clear together) → Central Command (kill Warden if confident) → North Landing or South Evac depending on remaining time. Bring two grenades per person.
3. Eos Chasm — The Vertical Map
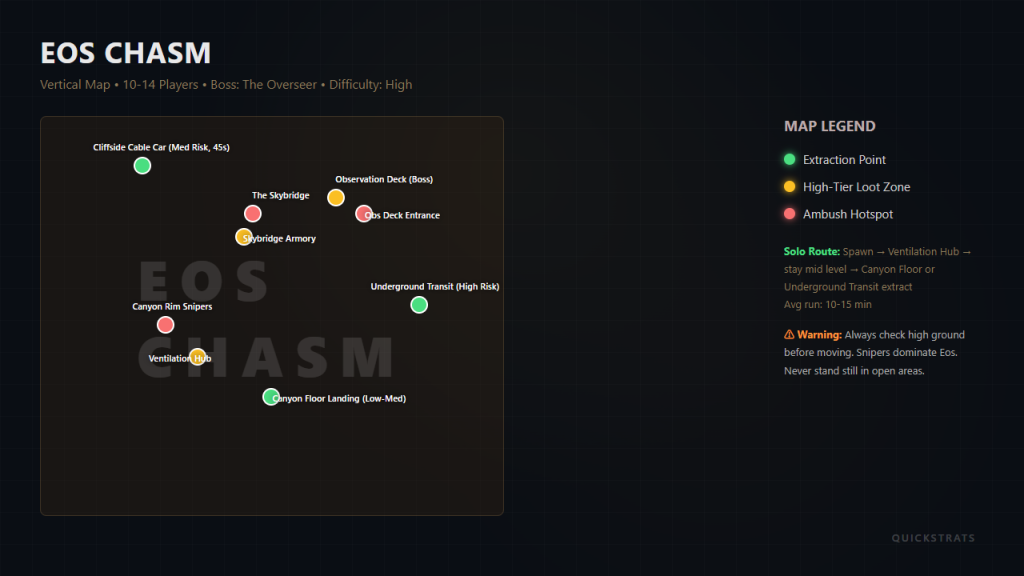
Eos Chasm is defined by elevation. The map is built into a canyon wall, with paths stacked on three vertical levels. If you are not looking up, you are already dead.
Map Profile
| Attribute | Detail |
|---|---|
| Size | Large (roughly 800m × 500m, but vertical) |
| Player count | 10-14 |
| AI presence | Medium (Drones, Phantoms, Snipers) |
| Boss | The Overseer (Observation Deck, spawns on player entry) |
| Extraction points | 3 |
| Difficulty | High. Vertical audio is tricky. Snipers dominate. |
Extraction Points
| Extract | Location | Risk Level | Notes |
|---|---|---|---|
| Cliffside Cable Car | Top level, western edge | Medium | Long activation time (45 seconds). You are exposed the entire time. |
| Canyon Floor Landing | Bottom level, center | Low-Medium | The safest extract if you control the high ground above it. |
| Underground Transit | Mid level, eastern tunnels | High | Popular camp spot. The tunnel has three approach angles. |
High-Tier Loot Zones
| Zone | Loot Type | Risk | Best Time to Visit |
|---|---|---|---|
| Observation Deck | Overseer Core, 2 Rare crates | Very High | After killing the Overseer |
| Skybridge Armory | Weapons, high-tier ammo | High | Mid-round (most players are on lower levels) |
| Ventilation Hub | Consumables, medium-tier weapons | Low | Early. One entrance, easy to hold while looting. |
Common Ambush Hotspots
- The Skybridge: Single-file crossing with no cover. Snipers on both sides watch this. Cross only after checking both ends with a scope.
- Canyon rim (top level): Snipers perch here. If you are on the bottom level, stay near walls and move between cover. Do not stand still in open areas.
- Observation Deck entrance: Boss room has one entrance. Players camp outside waiting for the team that killed the Overseer to come out. Check your escape route before entering.
Best Route: Solo
Spawn → Ventilation Hub (quick loot) → stay on mid level → Underground Transit or Canyon Floor Landing (extract). Avoid the Skybridge and Observation Deck. Average run: 10-15 minutes.
Best Route: Team Boss Run
Spawn → clear Skybridge snipers first → Armory (gear up) → Observation Deck (Overseer kill) → extract immediately via nearest exit. Do not linger after boss kill. Other teams hear the fight.
4. Vestan Deeps — The Dark Map
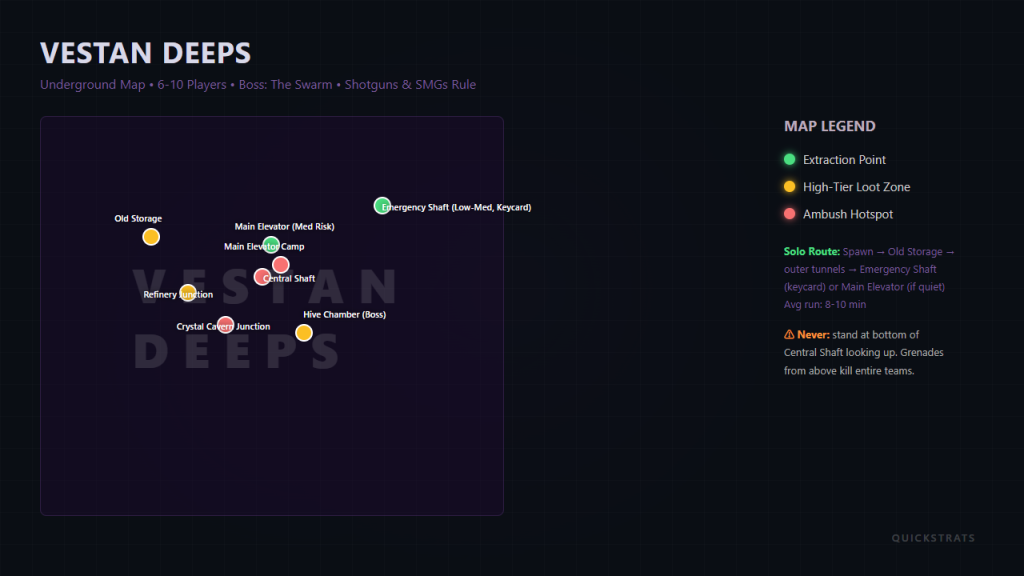
Vestan Deeps is underground. Lighting is minimal. Sound echoes. The map is a network of tunnels, caverns, and industrial ruins. Close-range weapons dominate. Shotguns and SMGs rule here.
Map Profile
| Attribute | Detail |
|---|---|
| Size | Small-Medium (roughly 400m × 400m, but winding) |
| Player count | 6-10 |
| AI presence | Heavy (Stalkers, Scavengers, Phantoms, Swarm optional boss) |
| Boss | The Swarm (Hive Chamber, Infestation modifier only) |
| Extraction points | 2 |
| Difficulty | Medium. Close quarters levels the gear gap. |
Extraction Points
| Extract | Location | Risk Level | Notes |
|---|---|---|---|
| Main Elevator | Center, top of the central shaft | Medium | Most direct. Audible from three tunnels away. Expect company. |
| Emergency Shaft | Northeast corner | Low-Medium | Longer walk but fewer campers. Needs a keycard to activate. |
High-Tier Loot Zones
| Zone | Loot Type | Risk | Best Time to Visit |
|---|---|---|---|
| Hive Chamber | Hive Extract (sells 8,000 credits) | High | Only on Infestation maps; skip otherwise |
| Refinery Junction | High-tier consumables, rare crafting mats | Medium | Mid-round, after initial spawn fights settle |
| Old Storage | Weapons, ammo, medium armor | Low | Early. Several small rooms to clear. |
Common Ambush Hotspots
- Central Shaft: The vertical core of the map. Grenades dropped from above kill entire teams. Never stand at the bottom looking up.
- Crystal Cavern junction: Three tunnels meet here. Every player on the map passes through at some point. Clear each tunnel mouth before crossing.
- Main Elevator waiting zone: The most camped spot on the map. Approach from the emergency shaft side so you come in behind typical camper positions.
Best Route: Solo
Spawn → Old Storage (loot) → stick to outer tunnels → Emergency Shaft (extract if you have keycard) or Main Elevator (if quiet). Do not go to Crystal Cavern unless you have to. Average run: 8-10 minutes.
Best Route: Team
Spawn → Old Storage → Refinery Junction (clear together) → Hive Chamber (if Infestation and have AoE) → Emergency Shaft extract. Bring shotguns.
5. Helios Array — The Endgame Map
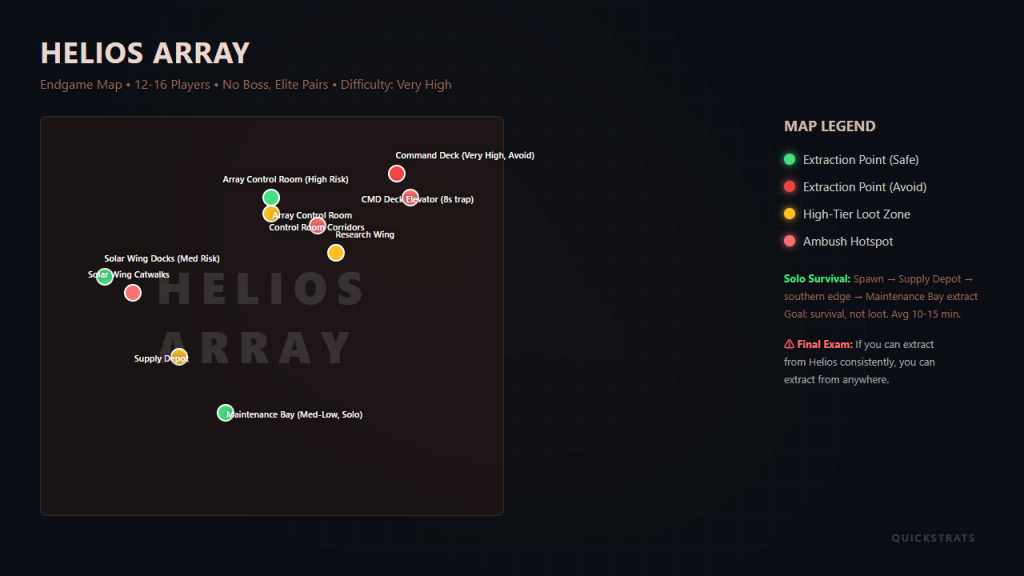
Helios Array is the hardest map. It is large, exposed, and full of veteran players running meta loadouts. The map is an orbital platform with shifting cover — solar flares periodically disable electronic sights and highlight player positions.
Map Profile
| Attribute | Detail |
|---|---|
| Size | Large (roughly 900m × 600m) |
| Player count | 12-16 |
| AI presence | Heavy (all types, including double Elite spawns) |
| Boss | None (but roaming Elite pairs) |
| Extraction points | 4 |
| Difficulty | Very High. Only go with your best gear. |
Extraction Points
| Extract | Location | Risk Level | Notes |
|---|---|---|---|
| Array Control Room | Central tower, top floor | High | Best loot on the map is here. Everyone knows it. |
| Solar Wing Docks | Western edge | Medium | Open approach. Check for snipers from the east tower. |
| Maintenance Bay | Southern underground | Medium-Low | Long walk but the safest option for solos. |
| Command Deck | North observation platform | Very High | Only 2 ways in. Both are camped heavily in final 5 minutes. Avoid. |
High-Tier Loot Zones
| Zone | Loot Type | Risk | Best Time to Visit |
|---|---|---|---|
| Array Control Room | Best loot on the map | Very High | Late (after most fighting is done) or with a full team |
| Research Wing | Rare weapons, high-tier armor | High | Mid-round. Less contested than Control Room. |
| Supply Depot | Ammo, consumables, medium weapons | Medium | Any time. Always worth a quick pass. |
Common Ambush Hotspots
- Control Room approach (both corridors): Long, straight hallways with no cover. Smoked or flashed before entry. Every time.
- Solar Wing catwalks: Below the main walkway, there are maintenance ledges. Ambushers hide there and shoot up through the grating.
- Command Deck elevator: The elevator ride is 8 seconds. You cannot move. You cannot shoot. If someone is at the top when the doors open, you are dead. Use the stairs instead.
Best Route: Solo Survival
Spawn → Supply Depot (fast loot) → stick to southern edge → Maintenance Bay extract. Do not go to Control Room or Command Deck. Average run: 10-15 minutes. Goal is survival, not loot.
Best Route: Team Sweep
Spawn → Research Wing (clear) → Control Room (clear, loot) → Solar Wing Docks extract. Control the high ground the entire route. Bring long-range weapons and at least one spotter.
6. Map-Specific Loadout Recommendations
| Map | Best Weapon Type | Why |
|---|---|---|
| Talos Station | Assault Rifle + SMG | Balanced range. Good for both concourse and CQB. |
| Eos Chasm | DMR / Sniper + Shotgun | Long sightlines demand range. Shotgun for tunnel fights. |
| Vestan Deeps | SMG + Shotgun | Everything is close range. Do not bring a sniper. |
| Helios Array | DMR + Assault Rifle | Need range for catwalks, rate of fire for room clearing. |
7. The 60-Second Marathon Map Check (Do This Before Every Run)
When you load in, you have 60 seconds before most players reach their first loot zone. Use that minute:
- Open your map. Identify your spawn and the nearest extract.
- Check the modifier (top-right of HUD). Infestation = Swarm on Vestan. Solar Storm = electronic sights disabled on Helios.
- Pick your route. Not the best loot route. The route with the most cover and the fewest choke points.
- Note the time. Boss spawns happen at specific marks. Plan to be near or far from them depending on your goal.
- Move. Standing still at spawn is how you get spawn-rushed.
Marathon Map Guide: The Bottom Line
Map knowledge is the single biggest advantage in extraction shooters. Gear comes and goes. Knowing where to go, where not to go, and where the other guy will be — that stays with you forever.
For new players: Learn Talos Station first. Run the solo route (Officer Quarters → Cargo Bay B → North Landing) until you know every corner. Then try a different map.
For intermediate players: Start running Eos Chasm with a DMR. Practice checking high ground before every move. The vertical awareness you build on Eos will make you better on every other map.
For advanced players: Helios Array is the final exam. If you can extract from Helios consistently, you can extract from anywhere.
QuickStrats — You Play. We Curate. Loot route infographics for all four maps coming soon.
Next: Marathon Loot & Economy Guide — where to farm credits, what to sell vs keep, and how to build wealth across runs.