Marathon Enemy & Boss Guide: Every Weakness and When to Fight vs Run
Knowing enemy patterns in Marathon matters more than having good aim.
Here is a stat that should bother you: most extraction deaths in Marathon are not from other players. They are from AI enemies that new players underestimate. A Stalker that flanks you while you are looting. A Heavy Gunner that pins you behind cover. A boss you did not know had a second phase.
This Marathon enemy guide exists so you stop dying to things you did not see coming.
If you are still learning the basics, read our Marathon beginner guide first. If you need the right build to handle these enemies, check our Marathon Shell build guide.
1. Why Enemy Knowledge Wins More Fights Than Good Aim
Good aim kills one enemy. Knowing enemy behavior kills the whole room.
In Marathon, every enemy has three things you need to know:
| Element | What It Means | Why It Matters |
|---|---|---|
| Behavior pattern | How it moves, patrols, and reacts to sound | You predict where it will be before it gets there |
| Weak point | Where shots do bonus damage | You kill it in half the time |
| Danger signal | The audio or visual cue before its deadliest attack | You dodge instead of dying |
Learn these three things for every enemy type below. That is the whole game.
The golden rule of this Marathon enemy guide: if you do not know an enemy’s danger signal, you are gambling every time you fight it. Stop gambling.
2. Common AI Enemies — The Grunts
These enemies appear on every map. They are not dangerous alone. They are dangerous because they waste your ammo, make noise that attracts players, and distract you while something worse closes in.
Stalker
| Attribute | Detail |
|---|---|
| HP | Low |
| Behavior | Flanks. Always. It will circle to your side or back while you fight something else. |
| Weakness | Headshots. One-tap with any rifle. |
| Danger signal | Soft footsteps to your left or right — not in front of you. |
| When to fight | Immediately, before it completes the flank. |
| When to run | Never run from a single Stalker. Kill it in 2 seconds and move on. |
How to handle it: The moment you hear flanking footsteps, stop what you are doing and kill the Stalker. Do not finish looting. Do not reload. Kill it first. A Stalker left alive for 10 seconds becomes a backstab.
Drone
| Attribute | Detail |
|---|---|
| HP | Very low |
| Behavior | Hovers, scouts, alerts nearby enemies when it spots you. |
| Weakness | Any damage. One bullet kills it. |
| Danger signal | High-pitched whirring sound + red scanning light. |
| When to fight | Instantly. Before it completes its scan. |
| When to run | If it already alerted a Heavy — reposition, the room is hot. |
How to handle it: Shoot it the second you see the red light. A Drone that finishes scanning turns a quiet room into a warzone. Speed matters more than accuracy here — hip fire is fine.
Scavenger
| Attribute | Detail |
|---|---|
| HP | Low-Medium |
| Behavior | Rushes toward dead bodies (player or AI) to loot them. Runs away if threatened. |
| Weakness | Slow to turn. Circle around it. |
| Danger signal | Scuttling sound near loot areas. |
| When to fight | Only if it is between you and your objective. |
| When to run | Let it run. It drops nothing valuable. Chasing it makes noise that attracts players. |
How to handle it: Ignore Scavengers unless they block your path. Every bullet you spend on a Scavenger is a bullet a nearby player hears.
3. Elite Enemies — The Run-Enders
Elite enemies are where runs go to die. Each one requires a specific approach. If you treat them like grunts with more HP, you will lose your best gear.
Heavy Gunner
| Attribute | Detail |
|---|---|
| HP | High |
| Behavior | Holds position. Suppressing fire. Forces you behind cover while other enemies reposition. |
| Weak point | Backpack power cell. Shots to the back deal 3× damage. |
| Danger signal | Spooling sound before sustained fire. You have 1.5 seconds to react. |
| When to fight | Only when you have cover and an exit route. |
| When to run | If you have no grenades and no flank angle — leave. Come back from a different direction. |
How to handle it: Never fight a Heavy Gunner from the front. Throw a grenade to force it to relocate, then shoot the backpack while it moves. Or have a teammate draw aggro while you flank. Fighting it face-to-face is a waste of ammo and armor.
Phantom
| Attribute | Detail |
|---|---|
| HP | Medium |
| Behavior | Teleports every 4 seconds. Always reappears behind or beside you. |
| Weak point | The 0.5-second window after teleporting — it cannot attack during this window. |
| Danger signal | Distortion sound + brief visual flicker before teleport. |
| When to fight | In open areas where you can see the flicker. |
| When to run | In tight corridors — Phantom wins in close quarters every time. |
How to handle it: Count to 4 after each teleport. On 4, spin and fire. The Phantom appears exactly where you were not looking. Use headphones — the audio cue direction tells you where it went.
Sniper
| Attribute | Detail |
|---|---|
| HP | Low |
| Behavior | Perches on high ground. Takes one shot every 6 seconds. Relocates after 3 shots. |
| Weak point | Scope glint gives away position. Extremely vulnerable while relocating. |
| Danger signal | Laser sight on your body for 1 second before firing. |
| When to fight | When you have a long-range weapon and know its position. |
| When to run | If you cannot reach it within 18 seconds (3 shots) — break line of sight and take a different route. |
How to handle it: The moment you see the laser, move sideways — never backward. The Sniper leads shots, but lateral movement breaks its tracking. After the third shot, rush its last known position. It cannot shoot while relocating.
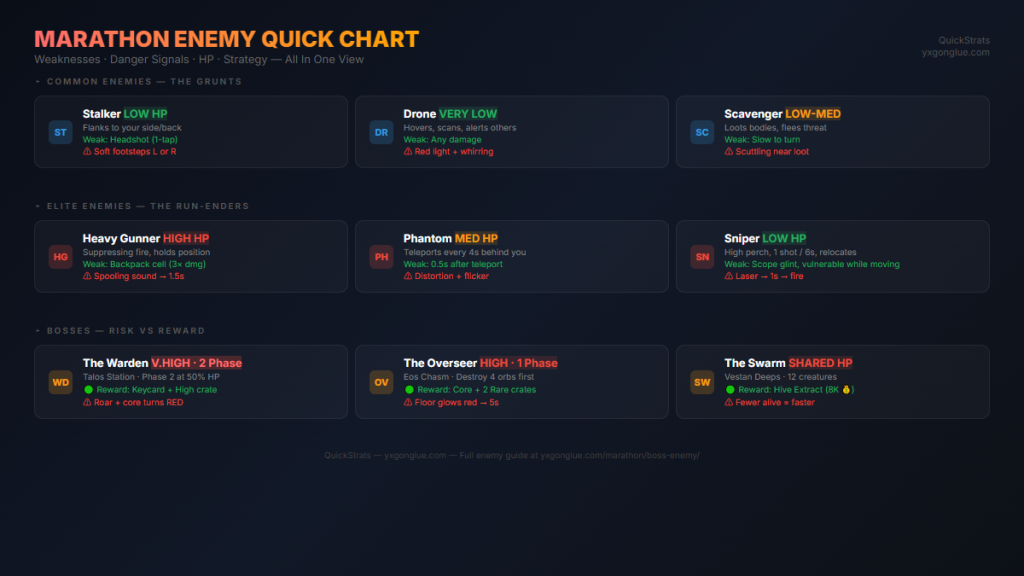
4. Boss Enemies — Complete Breakdown
Bosses in Marathon are not “bigger enemies.” They are skill checks. Each boss tests a different part of your game: positioning, ammo management, target priority, or escape timing.
The Warden — Talos Station Boss
| Attribute | Detail |
|---|---|
| Location | Talos Station — Central Command (spawns after 10-minute mark) |
| HP | Very High (approximately 4× Heavy Gunner) |
| Phases | 2 |
| Reward | Warden Keycard + High-tier weapon crate |
Phase 1 — Ranged Siege:
- Fires homing energy projectiles every 3 seconds.
- Summons 2 Drones every 20 seconds.
- Stays in the center of the room.
How to beat Phase 1: Kill the Drones immediately. They are not the threat — they are the distraction. While you shoot Drones, the Warden lands free hits. Assign one teammate to Drone duty. Everyone else shoots the Warden’s chest core (glows orange).
Phase 2 — Melee Rush (triggers at 50% HP):
- Stops firing projectiles.
- Charges at the nearest player. Each charge covers 15 meters.
- Slam attack deals 70% HP damage to any Shell without armor.
Danger signal before Phase 2: The Warden roars and its chest core changes from orange to red.
How to beat Phase 2: Spread out. The Warden can only charge one person at a time. When it charges you, run perpendicular — not away. Its turn radius during charge is terrible. The other teammates shoot the back. Repeat until dead.
When to run: If you are solo and below 50% HP when Phase 2 starts, leave. The Warden does not leave the boss room. Heal outside, come back. Boss HP does not reset for 60 seconds.
The Overseer — Eos Chasm Boss
| Attribute | Detail |
|---|---|
| Location | Eos Chasm — Observation Deck (spawns when a player enters the deck) |
| HP | High |
| Phases | 1 (but arena changes) |
| Reward | Overseer Core (used for high-tier crafting) + 2 Rare weapon crates |
Fight mechanic: The Overseer itself is stationary — it hovers above the deck and fires a rotating laser. The real fight is the arena: every 30 seconds, the deck sections start glowing red and then explode. You have 5 seconds to move off a glowing section.
How to beat it:
- Shoot the Overseer’s four floating orbs first — each destroyed orb reduces laser speed by 25%.
- Watch the floor more than the boss. The laser hurts. The explosions kill.
- After all four orbs are destroyed, the Overseer’s core opens for 10 seconds. This is your damage window.
When to run: If two or more deck sections are glowing simultaneously and you are out of position — run to the entrance. Dying to the floor is the number one cause of Overseer wipes.
The Swarm — Vestan Deeps (Optional Boss)
| Attribute | Detail |
|---|---|
| Location | Vestan Deeps — Hive Chamber (only spawns on maps with “Infestation” modifier) |
| HP | Collective HP pool shared across 12 small creatures |
| Phases | 1 |
| Reward | Hive Extract (sells for 8,000 credits to vendors) |
Fight mechanic: 12 creatures share one HP pool. Killing one reduces the pool. The fewer creatures alive, the faster the remaining ones move and attack.
How to beat it: Kill 8 of them quickly. Leave 4. The remaining 4 are fast but manageable. If you leave only 1 or 2, they become too fast to track. AoE weapons (grenades, shotguns) are ideal.
When to run: The Swarm is optional. If you do not have AoE damage or are low on grenades, skip it. The 8,000 credits are not worth losing a full loadout.
5. Boss Loot Tier List
Not all boss kills are worth the risk. Here is where each boss stands:
| Tier | Boss | Reward Value | Risk Level | Fight or Skip? |
|---|---|---|---|---|
| S | The Overseer | Overseer Core + 2 Rare crates | Medium | Fight. Best risk/reward in the game. |
| A | The Warden | Keycard + High-tier crate | High | Fight with team. Skip solo. |
| B | The Swarm | 8,000 credits | Low-Medium | Fight with AoE. Skip without. |
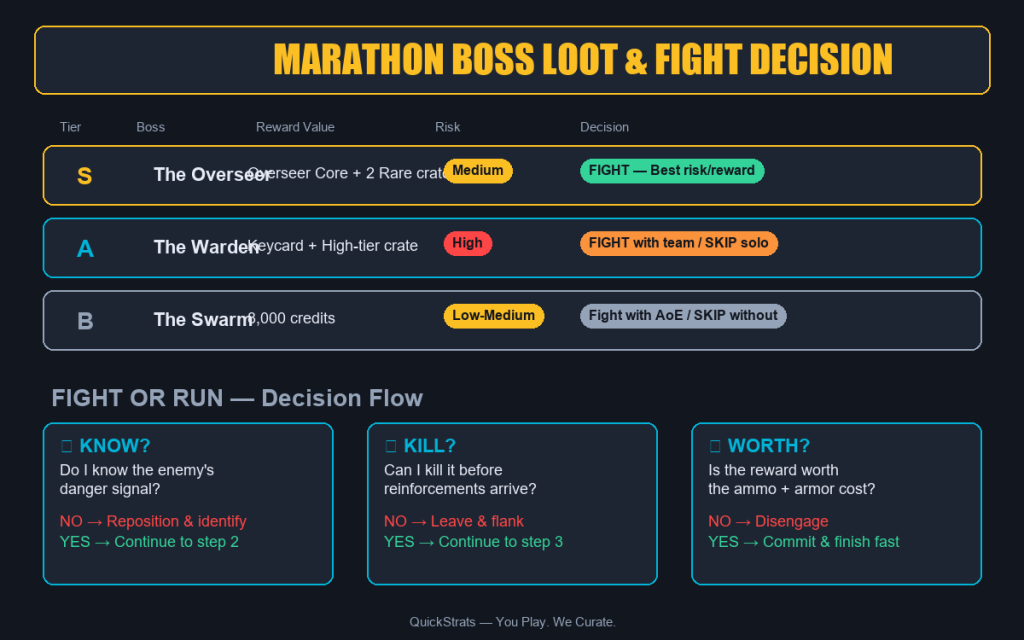
6. The Decision Framework — Fight or Run?
When you encounter any enemy in Marathon, ask yourself three questions in this order:
- Do I know its danger signal? If no → reposition until you identify it.
- Can I kill it before reinforcements arrive? Every 30 seconds of combat increases the chance of a third party showing up by roughly 20%.
- Is the reward worth the ammo and armor cost? A Scavenger drops nothing. A boss drops a run-changing item. Spend resources accordingly.
The 30-second rule: If a fight lasts more than 30 seconds, you are no longer fighting the enemy — you are ringing a dinner bell for every player on the map. Either finish it or leave.
7. How to Practice Without Losing Your Best Gear
Load into Talos Station with a budget build (see our Shell build guide for the 1,200-credit Striker setup). Do not try to extract. Your only goal is to find and fight specific enemy types.
Drills:
- Drone drill: Find a Drone. Count how long it takes to complete a scan. Kill it before it finishes. Repeat until you can do it in under 2 seconds.
- Phantom drill: Find a Phantom. Do not shoot it. Only dodge. Count its teleport pattern. After 5 teleports, then kill it. This teaches you the rhythm.
- Warden drill: Enter the Warden room. Survive for 60 seconds without shooting the boss. Focus only on dodging projectiles and killing Drones. This teaches you Phase 1 mechanics without burning ammo.
10 runs of practice drills save you 100 runs of lost gear.
Marathon Enemy Guide: The Bottom Line
Every enemy in Marathon is a puzzle. The puzzle has a solution. Your job is to learn the solution before the enemy forces you to pay for not knowing it.
For new players: Stay away from bosses. Learn the four common enemy types first. A Heavy Gunner will end your run just as fast as a boss if you fight it wrong.
For intermediate players: Start farming the Overseer. It is the most predictable boss and the reward is excellent. Use a Lancer build for the mobility.
For advanced players: Speedrun the Warden. A clean Warden kill under 90 seconds is the mark of someone who knows what they are doing.
QuickStrats — You Play. We Curate. Enemy guides for every Marathon map coming soon.
Next: Marathon Map Guide — every extraction point, loot zone, and ambush hotspot on all four maps.