Disclosure: This post contains affiliate links. If you buy through these links, we may earn a small commission at no extra cost to you.
The Kortz Center Heist dropped on July 14, 2026, and immediately became GTA Online’s best solo earner. But only if you do it right.
Go in loud and the guards swarm you before you reach the vault. Trip a single laser and the alarm locks you out of the best payout. Skip the CCTV wipe and the police are on you before you hit the exit. This Kortz Center solo stealth guide walks through two proven routes — Alpha Mail disguise and Sewer entry — so you can pick the one that fits your playstyle and walk out with $2 million or more.
What You Need Before Starting
The Kortz Center Heist has a steep entry fee. Hosting requires a Mansion plus the Art Studio expansion.
| Requirement | Cost |
|---|---|
| Cheapest Mansion | ~GTA$11.5M |
| Art Studio expansion | GTA$4.7M |
| Total minimum | ~GTA$16.2M |
GTA+ members get a GTA$2 million discount on the mansion, bringing the total to roughly GTA$14.2 million. Meanwhile, if you already own a mansion, you just need the Art Studio at roughly GTA$4.7 million.
Do not have GTA$16 million? Join other players’ heists as crew. You earn roughly $300K to $500K per run without spending a dollar on setup. Our Kortz Center Heist overview covers all three approaches and how to get started as a crew member.
Once you own the setup, register as a CEO and interact with the whiteboard in your Art Studio to begin.
Scope Out: What to Find
The scope out mission determines which entry points and optional prep missions are available. Do not rush it.
Pan each CCTV camera fully left and right to reveal points of interest. You need to tag:
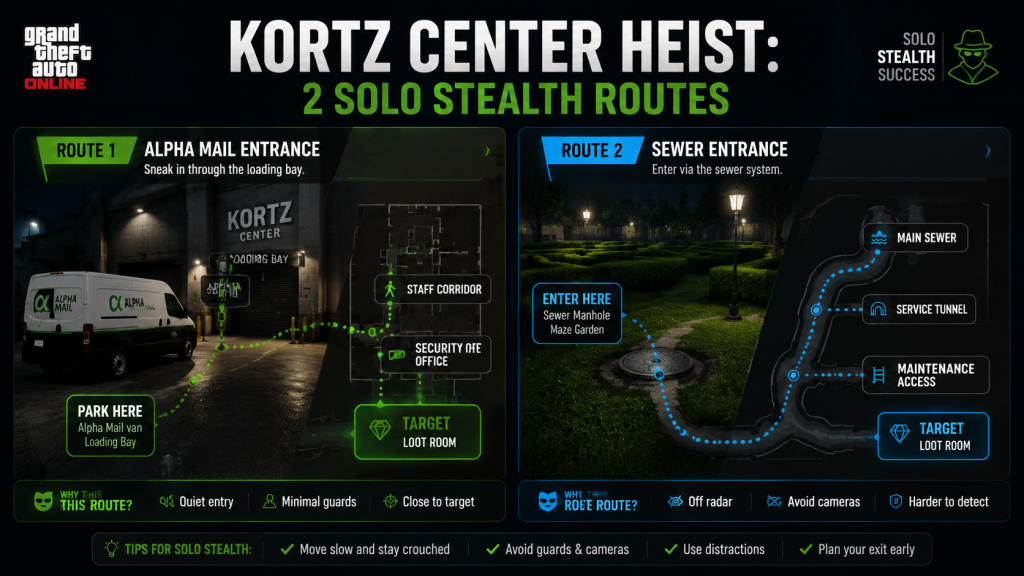
- Loading Bay — required for the Alpha Mail route
- Sewer manhole — photograph the manhole cover in the grass maze outside the Kortz Center, then find the manhole key at one of five random spawn locations around the exterior
- Security office — reveals guard patrol patterns on the minimap
- Vault area — shows the primary target and accessible secondary loot locations
- Rooftop — reveals the helicopter extraction point for the Annihilator Stealth getaway
Missing a point of interest during scope out means that entry option or prep mission stays locked for the entire run. Take an extra five minutes here. It beats restarting later.
Prep Missions: What to Pick for Solo Stealth
You need at least one Infiltration Gear, one Unmarked Weapons, one Getaway Vehicle, and both Equipment missions to launch the finale. The choices below are optimized for a clean solo stealth clear.
| Category | Pick This | Why |
|---|---|---|
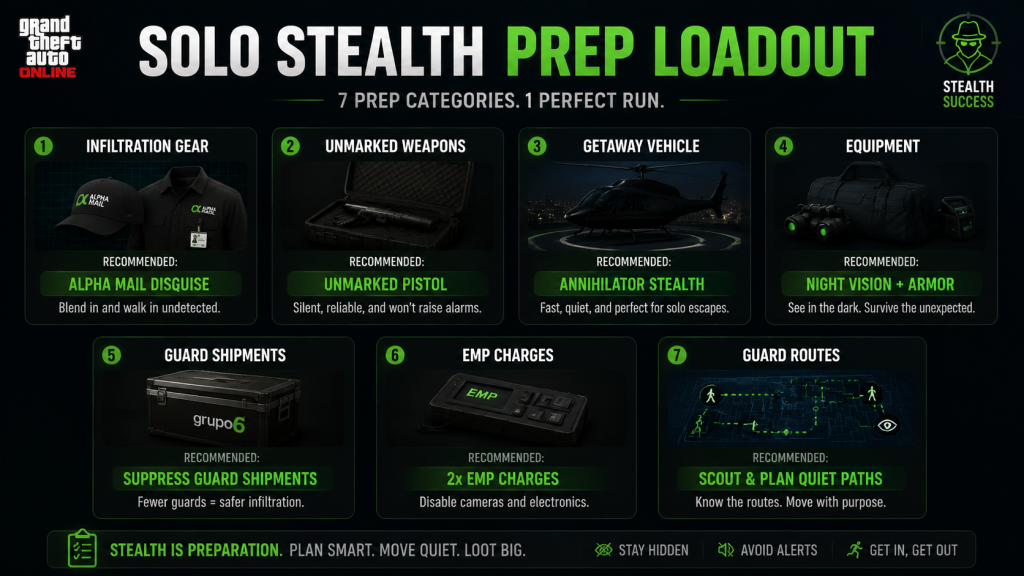
| Infiltration Gear | Alpha Mail Disguise | Lets you walk past the first wave of guards near the Loading Bay. Smoother than the Staff Key Card for this entry point. |
| Unmarked Weapons | Street Loadout | Fastest prep mission, solid silenced weapons. Only pick Military Loadout if you expect heavier combat during the escape phase. |
| Getaway Vehicle | Annihilator Stealth | Helicopter extraction from the rooftop. Cuts the escape time by roughly half compared to ground routes. |
| Equipment | Access Code + Hacking Device | Both mandatory. These unlock the laser room and vault keypad. No way around them. |
| Optional: Guard Shipments | Complete this | Cleaner guard kills. Eliminate patrols without alerting nearby enemies in the early rooms. |
| Optional: EMP Charges | Complete this | Disables lights and cameras during the blackout escape. Turns the hardest phase into a straight walk. |
| Optional: Guard Routes | Complete this | Shows every guard position on the minimap. Priceless for first-time solo stealth runs. |
The optional prep missions take roughly 15 to 20 minutes combined. Do all three. Guard Shipments and EMP Charges specifically turn the two hardest parts of this heist into a straight line. Skipping them to save time costs more time in restarts.
Route 1: Alpha Mail Disguise — Full Walkthrough
This is the most reliable route for a first solo clear. The Alpha Mail disguise buys you time in the early rooms. Plus, the Loading Bay entry gives you a controlled indoor path to the vault with clear guard patterns.
Step 1: Enter Through the Loading Bay
Drive the Alpha Mail van to the Kortz Center rear entrance. Park at the Loading Bay and grab the Loading Bay Key Card sitting near the green shipping containers. Use it on the locked keypad to enter the restricted area.
Inside, clear the guards in this exact order:
- Take out the first guard leaning against the wall immediately.
- Move up the left side. Wait for the third patrolling guard to walk away, then kill the two guards standing together.
- Sneak-walk toward the patrolling guard and eliminate him.
- Return to the CCTV server room area and kill the remaining guard.
Rushing this sequence is the number one reason solo runs fail early. Wait for the patrol to separate. Kill isolated guards first. Then clean up pairs.
Step 2: Hack the CCTV Server Room
Find the keypad door and interact with it. A fingerprint matching puzzle appears — identical to the Diamond Casino Heist hack. Only four fingerprint patterns exist. Memorize them or keep a reference image open on your phone while you play.
Once inside the CCTV server room, wait. A guard eventually leaves the computer area and walks toward the CCTV monitors. Kill him there, away from sightlines. Then interact with the monitors and select “Temporarily Disable CCTV.” This buys you a few minutes of safe movement through the next section.
Raf sends a six-digit code to your phone. Input it into the computer to unlock the laser room door.
Step 3: Navigate the Laser Grid
Three laser sections stand between you and the vault. Touch any beam and the alarm trips — and you cannot simply restart from a checkpoint. You must quit the heist entirely and relaunch from the planning board.
Section 1 — Left wall: Crouch-walk along the left side. Wait for the horizontal lasers to shift upward, then access the wall panel to disable the first set.
Section 2 — Right wall (hardest part): A floor laser sweeps forward and backward. Watch its pattern carefully. When the beam vanishes at the end of its sweep path, run through the gap between the two crossed diagonal lasers to reach the right wall panel. Most failed runs trace back to impatience here — wait half a beat longer than you think you need to.
Section 3 — Far left by the vault: Wait for the vertical beams to pass, crouch under them, then wait for a gap in the horizontal blocking lasers to reach the final panel.
Switch to first-person view for better depth perception on the laser beams. Use L3 to crouch. Hop over low floor beams with Square/X.
Step 4: Crack the Vault Keypad
With all lasers disabled, approach the vault door. A keypad flashes sequences of blue circles. Watch all four sequences. Memorize the fourth set — it flashes three times. Input that exact pattern, then repeat it twice more. Three identical entries and the vault opens.
Step 5: Swap the Artwork and Grab Secondary Loot
Inside the vault, follow the on-screen prompts to swap La Dernière Debauche with the counterfeit painting. After the swap is confirmed, grab the four additional paintings in the immediate vault area to fill your loot bag.
Keep an eye on the Vault Thermal Sensor timer. Leave yourself at least 10 seconds to exit before it triggers the alarm. Do not get greedy chasing distant paintings — solo bag capacity fills fast with nearby loot and the thermal sensor does not pause while you browse.
Step 6: Blackout and CCTV Wipe
Press the green button as you exit the vault. Take an immediate right turn to avoid the overhead camera. Enter the CCTV room and select “Wipe Vault CCTV Footage.” This step is not optional. Skip it and the police swarm your exit route within seconds.
Next, open the SecuroServ Hack app on your in-game phone and activate the EMP if you completed that prep. The lights go out across the building. Guards cannot see you unless you walk directly into them. Cameras are dead. Use your gun’s flashlight and the minimap to navigate the dark hallways.
Step 7: Escape Through the Exhibition Room
Here is where many solo players mess up. Do not plant an explosive charge on the exit keypad. It blows your stealth and spawns police immediately.
Instead, enter the doors on the right side of the hallway and kill a guard patrolling there. He drops the Exhibition Room Exit Keys. Should the first guard not have them, clear more guards until one does — the drop rate is high but not guaranteed on the first kill.
Follow the yellow objective marker up the stairs to exit the building.
Step 8: Rooftop Extraction
After the exterior cutscene, turn left immediately. Stairs lead to the rooftop where your Annihilator Stealth helicopter waits. Along the way:
- Kill the three patrolling guards on the roof approach.
- Jump over the railing before the pillar — a camera watches the stair entrance and you cannot disable it from that angle.
- Eliminate the final guard on the rooftop.
- Enter the helicopter and let the AI pilot fly you to safety.
The AI pilot is not perfect. It occasionally flies directly into police helicopters. The Elite Challenge does not require maintaining stealth after takeoff, so shoot down any pursuing helicopters if needed. They despawn near the getaway zone.
Route 2: Sewer Entry — Faster Alternative
The Sewer route skips the Alpha Mail disguise setup and gets you inside faster. It is less forgiving in the early rooms but cuts the total run to roughly 14 minutes once you know the layout.
What You Need
- Sewer scope out completed — photograph the manhole in the grass maze, then locate the manhole key at one of five spawn locations around the Kortz Center exterior
- Hazmat Suit selected as infiltration gear
- Guard Shipments optional prep completed (strongly recommended)
Step 1: Enter Through the Sewer
Park your vehicle before the Kortz Center detection range. Run through the grass maze on foot, find the sewer manhole, and use the key to enter. You emerge inside the building through a maintenance access point. Immediately change out of the Hazmat Suit at the garbage bags near the entry — the suit limits your movement speed for the rest of the run.
Step 2: Clear the First Room
Three guards patrol the sewer entry area. With Guard Shipments completed, you can eliminate them cleanly without nearby enemies hearing. Clear all three before advancing to the security corridor.
Step 3: Hack the Security Keypad
Approach the security door and complete the fingerprint hack — this is faster and safer than the thermite alternative. Shoot the overhead camera before it spots you, then kill the guard inside the code room. Only then should you input the six-digit security code from Raf.
Step 4: Laser Room, Vault, and Escape
From here, the path merges with Route 1. Navigate the laser grid, crack the vault keypad, swap the artwork, grab nearby secondary paintings, wipe the vault CCTV footage, and exit through the Loading Bay instead of the rooftop. Run downhill to the road, call a vehicle or steal one, and drive to the lockup. An armored Kuruma makes the final drive significantly safer if you own one.
Payout Breakdown
| Component | Payout |
|---|---|
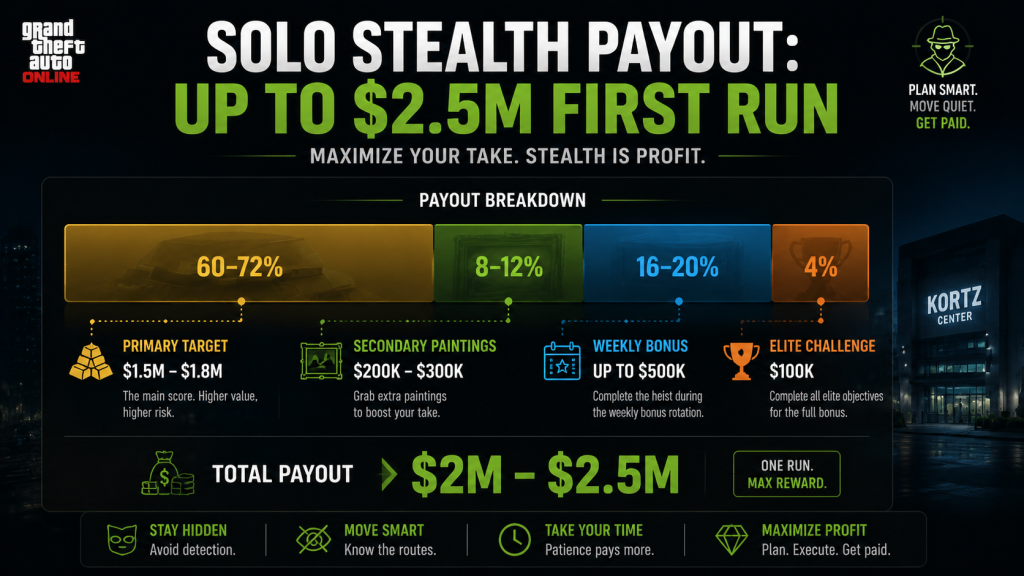
| Primary target (La Dernière Debauche swap) | ~$1.5M – $1.8M |
| Secondary paintings (×4, near vault) | ~$200K – $300K |
| First-run weekly bonus (4x) | Up to $500K |
| Elite Challenge bonus | ~$100K |
| Total (first weekly run) | ~$2M – $2.5M |
| Total (repeat runs) | ~$1.3M – $1.7M |
Your first clear each week gets the 4x bonus multiplier. Repeat runs within the same week lose this bonus and pay closer to the base amounts. Plan your heist sessions around the Thursday weekly reset to maximize earnings per run.
For context on how these numbers compare to other post-nerf money methods, see our GTA Online money methods ranking.
Solo Limitations
The Kortz Center Heist was designed with co-op in mind, though solo is fully viable for nearly everything. One specific room on Exhibit Level 2 requires two players to open — both must stand on pressure plates simultaneously. If the buyer’s list sends you to items inside that room, you cannot complete that bonus objective as a solo player.
This means solo players miss a secondary payout bonus on some runs. The loss is roughly $50K to $100K — annoying but not deal-breaking. The primary target and nearby vault paintings still net roughly $2 million without it.
Common Mistakes and How to Avoid Them
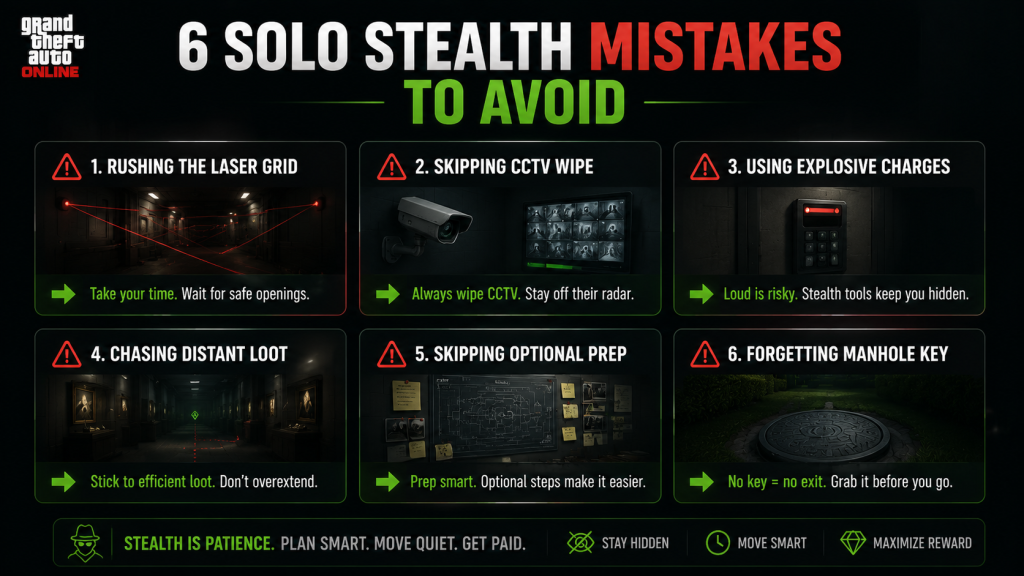
Mistake 1: Rushing the laser grid.
The lasers follow fixed patterns. Memorize the floor beam timing in Section 2 — it sweeps forward, vanishes at the end of its path, then sweeps back. Move only during the vanish window. Most restarts happen because a player moved half a second too early.
Mistake 2: Skipping the CCTV wipe.
After swapping the artwork, the CCTV wipe is the difference between a clean escape and an instant police response. Build the muscle memory: vault exit → green button → right turn → CCTV room → wipe footage. Do it every time.
Mistake 3: Using explosive charges on the exit door.
The prompt to plant a charge looks like a shortcut. It is not. Explosives alert the police and erase your stealth bonus. Take the extra 30 seconds to find the Exhibition Room Exit Keys instead.
Mistake 4: Chasing distant secondary loot.
Solo bag capacity is limited. The four paintings near the vault fill it almost completely. Running to far hallways for an extra $30K painting risks triggering the thermal sensor alarm and costs you more than you gain.
Mistake 5: Skipping optional prep missions.
Guard Shipments and EMP Charges take roughly 15 minutes to complete. They save roughly 10 minutes of frustration during the heist and dramatically reduce restart risk. The math is straightforward — do the prep.
Mistake 6: Forgetting the manhole key on Sewer runs.
The Sewer route needs a manhole key that spawns at one of five random exterior locations. Find it during the scope out mission. Do not arrive at the grass maze empty-handed.
FAQ
Can you solo the Kortz Center Heist?
Yes. The entire heist is soloable from scope out through extraction. The only limitation is a two-player pressure-plate room on Exhibit Level 2 that may block one secondary bonus objective. The primary target and roughly 90% of secondary loot are fully accessible solo.
Which approach is better for a first solo attempt: Alpha Mail or Sewer?
Alpha Mail. The disguise lets you walk past early guards and the Loading Bay entry gives you a controlled indoor path with predictable patrol patterns. Sewer is faster — roughly 14 minutes with practice — but the early rooms are tighter and less forgiving. Start with Alpha Mail. Switch to Sewer once you know the building layout.
How much does the Kortz Center Heist pay solo?
A clean first-run solo stealth clear pays roughly $2 million to $2.5 million with the weekly bonus. Repeat runs within the same week pay roughly $1.3 million to $1.7 million. The exact number depends on secondary loot RNG and the Elite Challenge bonus.
What is the hardest part of the solo stealth run?
The laser grid Section 2 — the right wall with the sweeping floor beam and two crossed diagonal lasers. The timing window is narrow and the penalty for touching any beam is a full heist restart. Switch to first-person view there, wait for the floor beam to vanish completely, then move.
Do I really need the EMP Charges prep?
Technically no. Practically yes. EMP Charges disable lights and cameras during the escape phase, which turns the hardest part of the heist into a straight walk to the exit. For roughly 10 minutes of prep work, the value is hard to overstate.
Is the Annihilator Stealth helicopter worth the prep time?
Yes. The rooftop extraction cuts escape time by roughly half compared to running out on foot. Without it, you must navigate the Kortz Center exterior while guards search for you — doable but significantly harder, especially on a first solo attempt.
The Bottom Line
The Kortz Center Heist solo stealth run is the best money in GTA Online right now. It demands roughly GTA$16 million to host, roughly 15 minutes of prep per run, and roughly 40 to 55 minutes for the finale. In exchange, it pays roughly $2 million or more on your first weekly clear.
The stealth approach is not the easiest way to play this heist. But it is the only way to consistently hit the maximum payout as a solo player. Learn the laser grid timing. Never skip the CCTV wipe. Bring the EMP Charges. And run the Alpha Mail route on your first attempt — it gives you room to learn the building before you push for faster Sewer clears.
Pair this heist with the Acid Lab and Agency work from our money methods rotation guide and you will have the most efficient solo income loop in the post-nerf meta.
More GTA Online: Kortz Center Heist Overview — All 3 Approaches | GTA Online Money Methods 2026: Best $/Hour Ranked | GTA+ Subscription: Is It Worth $7.99/month? | GTA VI Ultimate Guide Hub
Sources: GameRant solo stealth walkthrough | IGN Kortz Center Heist details | Eurogamer security office guide | AllThings.How laser grid guide