Disclosure: This post contains affiliate links. If you buy through these links, we may earn a small commission at no extra cost to you.
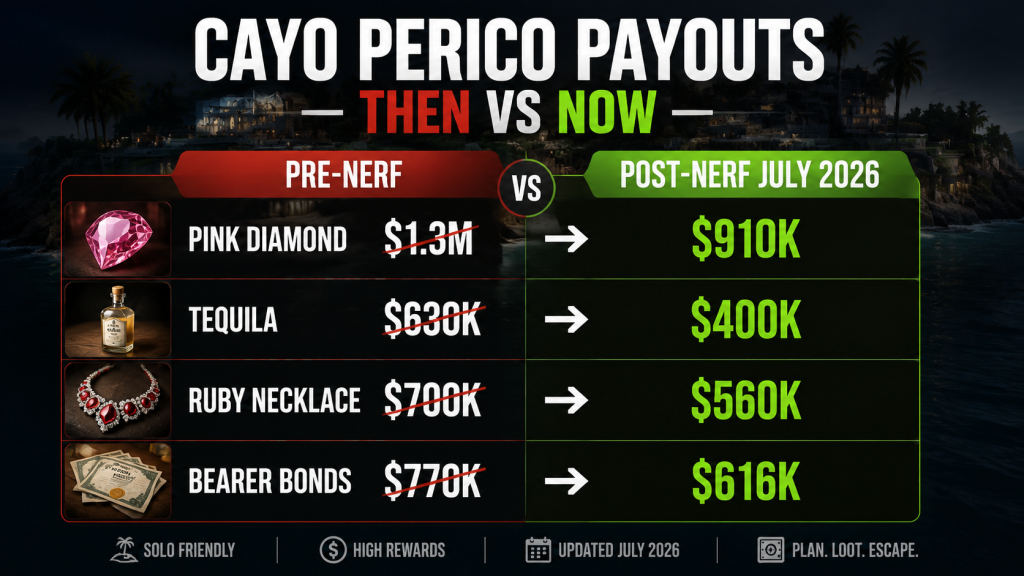
Cayo Perico is not what it used to be. Rockstar cut payouts by 30% on July 14, 2026. The Tequila spawns roughly 80% of the time on repeat runs. Pink Diamond is down to roughly $910,000. The solo cooldown stretches to 2 hours and 24 minutes. Old guides that promise $1.5 million per hour are lying to you.
But here is what the complainers miss: Cayo Perico still pays roughly $600,000 to $900,000 per solo run. Nothing else at the $2.2 million price point comes close. The closest competitor is the Kortz Center Heist, which requires a $16.2 million Mansion. For a solo player who wants the best dollar-per-hour activity under $5 million, the Kosatka is still the answer.
This Cayo Perico solo guide uses confirmed post-nerf numbers from July 2026. No outdated payouts. No “just get the Pink Diamond” advice that ignores the 80% Tequila reality. Just the route, the prep, and the numbers that actually matter right now.
What You Need
| Requirement | Cost | Notes |
|---|---|---|
| Kosatka Submarine | $2,200,000 | Base price. Buy from Warstock Cache & Carry. |
| Sparrow Helicopter (optional) | $1,815,000 | Cuts prep time by roughly 40%. Pays for itself fast. |
| Total Minimum | $2,200,000 | Without Sparrow, prep takes roughly 60-75 minutes total. |
If $2.2 million sounds steep, our beginner money guide walks through earning it from zero. Short version: Acid Lab first ($1M), run it for a week, buy the Kosatka with profits.
The Post-Nerf Payout Table
These are the numbers that matter as of July 2026. Everything else you read online is outdated.
| Primary Target | Old Value | New Value (Normal) | New Value (Hard) | Spawn Rate (Repeat Runs) |
|---|---|---|---|---|
| Sinsimito Tequila | $630,000 | $400,000 | $440,000 | ~80% |
| Ruby Necklace | $700,000 | $560,000 | $616,000 | ~12% |
| Bearer Bonds | $770,000 | $616,000 | $677,600 | ~6% |
| Pink Diamond | $1,300,000 | $910,000 | $1,001,000 | ~2% |
| Panther Statue | $1,900,000 | $1,900,000 | $2,090,000 | Event only |
Secondary loot also took a 10% cut. Gold, cocaine, weed, cash, and paintings are all worth less than they were. However, the ranking stays the same: gold > cocaine > weed > cash > paintings for value per bag space.
Fencing fee: Pavel takes 2%. The cartel takes 10%. Combined, roughly 12% comes off your gross. A $600,000 take becomes roughly $528,000 in your account.
Elite Challenge bonus: +$50,000 (Normal) or +$100,000 (Hard Mode). Requirements: finish under 15 minutes, full loot bags, zero failed hacks.
Scope Out: The Minimum You Need
The full scope out is tedious. Here is exactly what you need and what you can skip.
Must find:
- Primary target — Go to the communications tower. Hack the box. Scroll through all cameras until you see it. This determines your entire payout.
- Drainage Tunnel — Drive a boat behind the compound. Dive down. The tunnel is on the underwater cliff face. Photograph it. This is your infiltration point every single run.
- Secondary loot at the Main Dock — On the way back from the tower, swing by the Main Dock. Scope two tables of secondary loot. Cocaine is best. If you find two cocaine tables at the dock, you are set.
Nice to find:
- Guard clothing — Lets you walk past guards in certain areas. Not essential for the drainage tunnel route.
- Grappling hook — Useful if you want to enter the compound via the wall instead of the tunnel.
- Supply truck — Can drive through the front gate. But the drainage tunnel is faster.
Skip entirely:
- Bolt cutters, grappling equipment (if using drainage tunnel), guard patrol patterns, secondary targets beyond the Main Dock and airstrip.
Scope out time: roughly 8 to 12 minutes once you know the route. Take a boat from the dock, drive to the tower, hack, scope primary, drive to Main Dock, scope two secondary tables, fly back. Done.
Prep Missions: What to Do and What to Skip
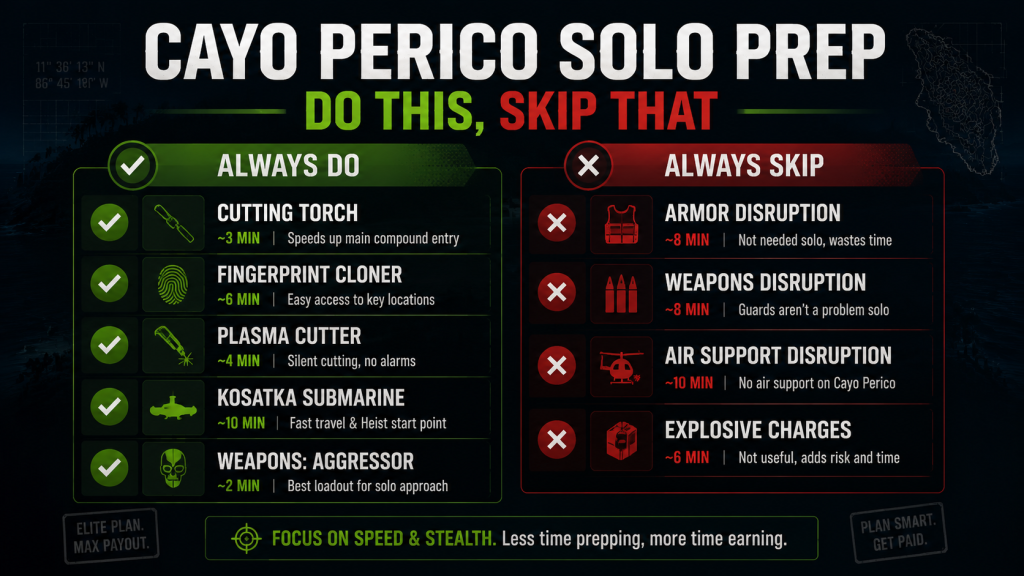
Five mandatory preps. Three skippable. Here is the breakdown.
Always Do
| Prep | Time | Notes |
|---|---|---|
| Cutting Torch | 5-7 min | Required for drainage tunnel entry and cutting locks inside the compound. |
| Fingerprint Cloner | 5-8 min | Required to hack the basement elevator. Four patterns. Memorize them. |
| Plasma Cutter / Safe Code | 5-8 min | Depends on primary target. Bearer Bonds = Safe Code. Everything else = Plasma Cutter. |
| Approach Vehicle: Kosatka | 5-7 min | Steal the sonar jammer. Fast prep. The Kosatka puts you right at the drainage tunnel. |
| Weapon Loadout: Aggressor | 5-7 min | Assault rifle with suppressor. Best all-around solo weapon. Follow a Merryweather helicopter or raid an office building — dashboard if you get the helicopter mission, it takes forever. |
Always Skip
| Prep | Why Skip |
|---|---|
| Disruption: Armor | Unnecessary. Stealth run = no combat. |
| Disruption: Weapons | Same as above. Do not get detected. |
| Disruption: Air Support | Same. Stealth makes all disruptions irrelevant. |
| Explosive Charges | Cutting torch does the same job. Skip. |
Total prep time with Sparrow: roughly 25 to 35 minutes. Without Sparrow: roughly 40 to 55 minutes. The Sparrow pays for itself within roughly 8 to 10 Cayo runs in saved time alone.
Cayo Perico Solo Guide: The Finale Route Step-by-Step
This route works every time. It has since 2021 and the nerf did not change the mechanics.
Step 1: Infiltrate via Drainage Tunnel
Select the Kosatka as your approach vehicle. Select the Drainage Tunnel as your infiltration point. Pick nighttime for better cover. When the finale starts, drive the Kosatka to the yellow marker near the drainage tunnel. Dive out, swim to the tunnel entrance, and use the cutting torch to open the grate. You are now inside the compound.
Step 2: Clear the Compound (Stealth)
You emerge in the basement. Go up the stairs. Turn left toward the office. The route from here depends on your comfort level:
Beginner route: Go up the stairs to the roof level. Walk along the perimeter. Drop down near the office. Kill the guard outside the office door (headshot, silenced). Enter the office.
Fast route: Go up the central stairs. Wait for the juggernaut to pass. Head to the office directly. Kill the two guards near the office entrance. This saves 30 to 45 seconds but requires timing the juggernaut.
Once in the office, kill the guard inside. Access the wall safe for roughly $50,000 to $99,000 in cash. Then hack the basement elevator using the fingerprint cloner. Four prints. Match the patterns.
Step 3: Grab the Primary Target
Take the elevator to the basement. Cut the lock on the primary target display case. Grab it. If there are paintings in the office, grab those too — they fill your loot bag without taking secondary space.
Step 4: Exit the Compound
Leave the office the way you came. Go back down to the basement. Exit through the drainage tunnel grate. Or, if you want secondary loot, exit through the main gate — kill the guard near the gate, grab the motorcycle, and drive to the Main Dock.
Step 5: Secondary Loot at the Main Dock
The Main Dock has two to four loot tables. Cocaine is best for solo players at roughly $178,000 to $202,000 per full bag. Weed is next. Cash is worst. Fill your bag completely. The Elite Challenge requires full loot bags.
Kill guards at the dock one by one. Stay crouched. Use silenced headshots. If a guard spots you before you shoot, restart. The Elite Challenge timer is ticking but 15 minutes is extremely generous — you should finish in 11 to 13 minutes with this route.
Step 6: Escape
Grab a boat at the Main Dock. Drive away from the island. Or, from the compound exit, grab a motorcycle, drive to the cliff southwest of the compound, jump into the water, and swim for roughly 20 to 30 seconds. Either method triggers the escape cutscene.
Total finale time: 11 to 14 minutes with practice. Elite Challenge: +$50,000 (Normal) or +$100,000 (Hard Mode).
Hard Mode: Is It Worth It?
Hard Mode adds 10% to the primary target value and increases the Elite Challenge bonus to $100,000. To activate it, start the heist within 48 real-life minutes of Pavel texting you that Cayo Perico is available again.
Is it worth it? On a Tequila run, Hard Mode adds roughly $40,000. On Pink Diamond, roughly $91,000. Given that the harder guards add maybe 30 seconds to your run, yes — always run on Hard Mode if the timer allows. The only exception is if you are tired and just want an easy clear. Tequila on Normal vs Tequila on Hard is a $40,000 difference. That buys one Stash House run worth of supplies. Not nothing, but not worth stressing over.
The Cooldown Problem
Solo cooldown: 2 hours and 24 minutes. This was added to kill the Cayo grind meta. It succeeded.
Do not sit in a lobby waiting for the cooldown to expire. Here is what you do between Cayo runs:
- Sell your Acid Lab batch. $291,000 profit in seven minutes.
- Run a Payphone Hit. $45,000 in five minutes.
- Check your Bunker. Buy supplies. Sell if a batch is ready.
- Empty your Nightclub safe. $50,000 in one minute.
- Run a Cluckin’ Bell Farm Raid if you want active work. $400,000 in 45 minutes.
One Cayo run + Acid Lab sale + Payphone Hit + Nightclub safe + Bunker sale nets roughly $900,000 to $1.2 million in roughly 90 minutes of play. Do that once a day and you are earning more than the old Cayo grinders who ran it four times in an evening. For the full rotation, read our GTA Online money methods guide.
Common Mistakes
Mistake 1: Not scoping secondary targets at the Main Dock.
If you do not scope secondary loot, you run blind. You waste time searching every table. Scope two cocaine tables at the dock during the scope out. Save yourself five minutes of wandering.
Mistake 2: Doing disruption preps.
If you are detected, you restart. Disruptions only matter if you fight your way through, which you should never do. Skip them. Every single time.
Mistake 3: Grabbing cash secondary loot.
Cash fills your bag with roughly $78,000 to $89,000. Cocaine fills it with roughly $178,000 to $202,000. The bag space is the same. The payout is not. Find cocaine. Settle for weed if you must. Never grab cash.
Mistake 4: Waiting for the cooldown instead of doing other activities.
The cooldown exists to make you play other parts of the game. Two hours of Acid Lab, Agency work, and Bunker sales earn more than a second Cayo run with an 80% Tequila spawn. Do not fight the cooldown. Use it.
Mistake 5: Doing the Merryweather weapons prep.
If you get the mission where you follow a Merryweather helicopter, find a new session and restart the prep. The helicopter mission takes 10 to 12 minutes. The office building mission takes 5 to 7. Dashboarding saves real time.
FAQ
Is Cayo Perico still worth doing in 2026?
Yes. A solo Tequila run with cocaine secondary loot pays roughly $528,000 after fees. Add the Elite Challenge and you are at roughly $578,000. In roughly 50 to 65 minutes including prep. That is roughly $530,000 to $690,000 per hour. No other activity under $5 million matches that.
What is the best approach vehicle for solo?
Kosatka. It puts you directly at the drainage tunnel with zero travel time. The Longfin works too if you want to hit secondary loot before the compound, but for the standard solo route, Kosatka is simpler and faster.
How do I get the Pink Diamond to spawn?
You do not. It is random. On your first run each week, the spawn rates are roughly equal. On repeat runs, Tequila takes over at roughly 80%. There is no trick to force Pink Diamond. Just run the heist with whatever target you get.
Should I buy the Sparrow?
Yes. It cuts prep mission travel time by roughly 40%. The Sparrow spawns directly next to your Kosatka and lands almost anywhere. Without it, you drive a boat to shore, call a car, drive to the prep, drive back, boat back. With it, you fly directly to and from each prep in roughly half the time. At $1,815,000, it pays for itself within roughly 8 to 10 Cayo runs.
Can you still solo the gold secondary loot?
No. Gold is locked behind dual-keycard doors that require two players. As a solo player, cocaine is your best secondary loot, followed by weed. If the compound office has paintings, those are a bonus — they fill bag space without requiring a trip to the dock.
The Bottom Line
Cayo Perico got worse on July 14, 2026. Anyone who says otherwise is still quoting pre-nerf numbers. But “worse” does not mean “bad.” It means the heist went from absurdly profitable to merely excellent.
A solo run with Tequila and cocaine still earns roughly $530,000 to $580,000 in under an hour of combined prep and finale. The Kosatka costs $2.2 million and pays for itself in roughly four runs. After that, every run is pure profit. Name another GTA Online activity that delivers this consistently with zero crew coordination required. There is not one — the Kortz Center Heist pays more but costs $16.2 million to host.
Run Cayo once per weekly reset. Rotate through your Acid Lab, Agency, Bunker, and Nightclub during the cooldown. Stop grinding it on repeat expecting Pink Diamond every time. The meta shifted from repetition to rotation. This heist is still the centerpiece of any solo money strategy. It just needs the rest of the rotation around it now.
For the full ranking of where Cayo Perico sits among every money method, see our GTA Online money methods guide. For what to buy with your Cayo earnings, see our best properties ranking.
More GTA Online: GTA Online Money Methods 2026: Best $/Hour Ranked | Best Properties: Every Business Ranked | Beginner Money Guide: $0 to $2M | Kortz Center Solo Stealth Walkthrough | GTA VI Ultimate Guide Hub
Sources: Cayo Perico Solo Money Guide 2026 — Timesaver.gg | GTA Online Economy Update 2026 — Gfinity | Heist Payout Nerfs — NerdsChalk