Disclosure: This post contains affiliate links. If you buy through these links, we may earn a small commission at no extra cost to you.
The Acid Lab is your first $500,000. The Bunker is where that money starts working for you.
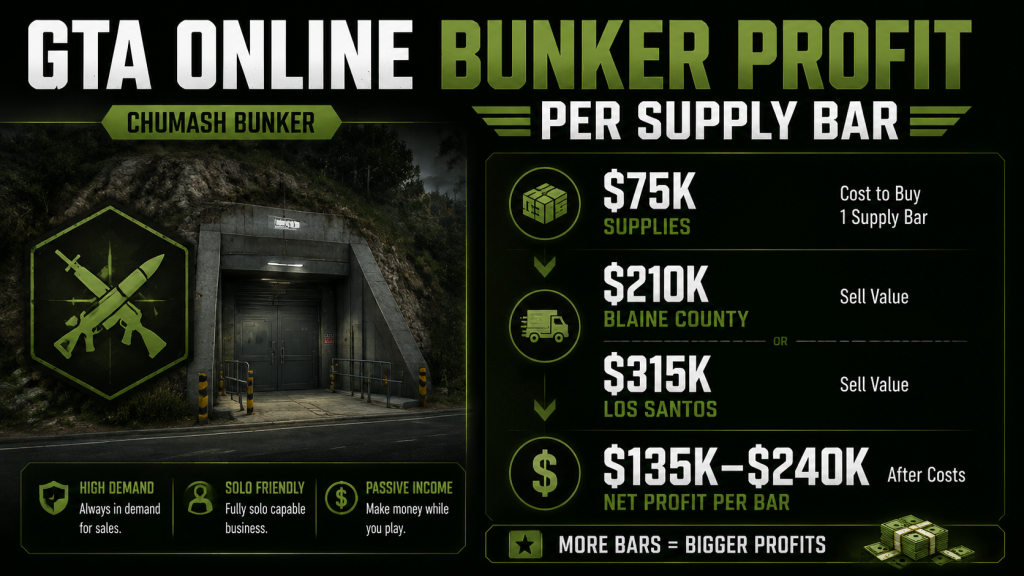
Here is the math: one full supply bar costs $75,000. With both upgrades, that single bar produces $210,000 of stock if you sell to Blaine County — or $315,000 if you sell to Los Santos. Net profit: $135,000 to $240,000. The entire operation takes zero active work. Buy supplies at the laptop. Wait. Sell. That is the entire process.
When to sell matters more than where your Bunker is. Sell at one full supply bar and you get exactly one vehicle. Every time. Sell at two bars and the game might hand you two vehicles and 15 minutes to deliver them both across the map. For a solo player, one vehicle is the only number that matters.
This guide covers the location that saves you minutes per sale, the upgrade order that maximizes profit per hour, the sell threshold that keeps every delivery solo, and where the Bunker fits between your Acid Lab and your eventual Nightclub empire.
What the Bunker Actually Does
The Bunker is an underground weapons manufacturing facility. You buy or steal supplies. Your staff converts those supplies into stock — guns, ammunition, military equipment. You sell the stock to buyers around the map.
Two features make the Bunker different from the Acid Lab and every other passive business:
One: the profit per supply bar is better. The Acid Lab turns $75,000 of supplies into roughly $335,000 to $502,000. Meanwhile, the Bunker turns that same $75,000 into $210,000 to $315,000. At first glance, the Acid Lab makes more per sale. Here is the catch: it fills one batch at a time. By contrast, the Bunker produces continuously. Over a long play session, the Bunker generates more total passive income because you are not waiting for one batch to finish before starting the next.
Two: the Bunker unlocks Research. Half your staff can be assigned to Research instead of Manufacturing. Research unlocks weapon upgrades — explosive ammunition, thermal scopes, vehicle weapon mods. These are permanent unlocks applied to your guns and vehicles forever. The trade-off: assigning staff to Research means zero manufacturing, zero stock, zero income. Most players run Manufacturing only, buy all their supplies, and use the profits to Fast-Track research later when they have cash to burn.
Whether Research is worth it depends entirely on how much you care about PvP. If you never fight other players, skip Research. If you want explosive rounds on your Heavy Sniper, run Research after you have bought every other business and have a comfortable bankroll. It is a luxury, not a necessity.
Best Bunker Locations
Bunker sell missions start at your Bunker. The delivery points are always somewhere else on the map. The closer your Bunker is to the center of the map, the shorter every sale. Shorter sales mean more time for other money methods.
| Location | Price | Verdict |
|---|---|---|
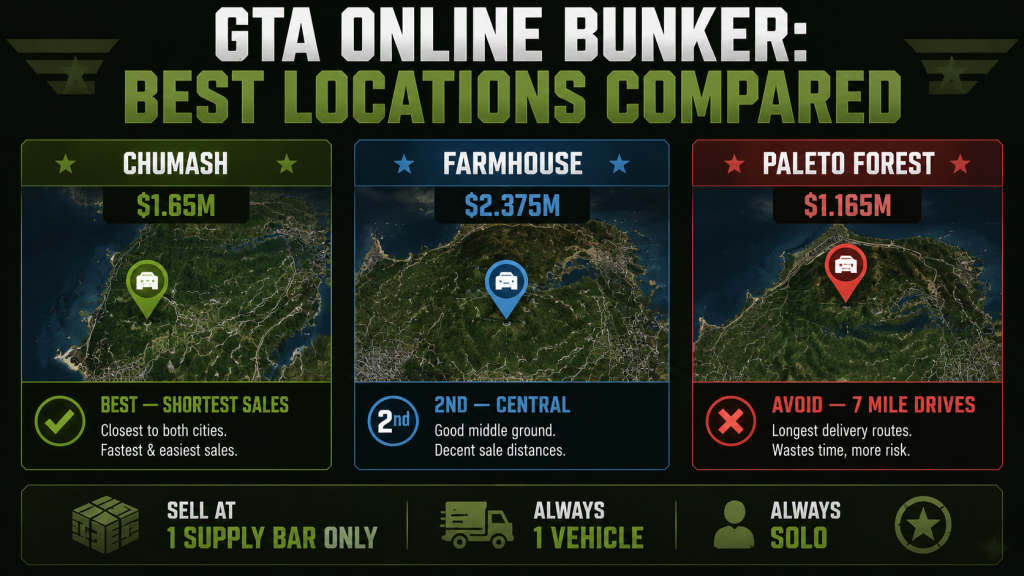
| Chumash | ~$1.65M | Best. West coast highway access. Shortest average sale distance. Buy this one. |
| Farmhouse | ~$2.375M | Second best. Central, rural, easy helicopter access. Expensive. |
| Route 68 | ~$1.95M | Decent. Central but dirt roads slow you down. |
| Paleto Forest | ~$1.165M | Avoid. Far north. Every sale is a 5 to 7 mile drive. You will hate your life. |
| Ratón Canyon | ~$1.45M | Avoid. Isolated. Mountain roads make delivery vehicles flip. |
Spend the extra $500,000 for Chumash. The time it saves over 50 sales will pay for the upgrade three times over. If you bought Paleto Forest because it was cheap — sell it now, take the loss, buy Chumash. I am not exaggerating. The Paleto Bunker is the single most regretted purchase among GTA players I talk to.
Bunker Upgrades: What to Buy and in What Order
Equipment Upgrade (~$1,155,000) — Buy First
This upgrade increases the value of every unit of stock your staff produces. Without it, one supply bar produces roughly $150,000 of stock instead of $210,000. Over 10 full supply cycles, skipping the Equipment Upgrade costs you roughly $600,000 in lost profit — half the upgrade price. If you plan to run the Bunker more than 20 times, the Equipment Upgrade pays for itself and everything after is extra.
Staff Upgrade (~$598,000) — Buy Second
Speeds up production. With both Equipment and Staff upgrades, one full supply bar converts to stock in roughly 2 hours and 20 minutes. Without Staff, closer to 3 hours. If you play in 2 to 3 hour sessions, the Staff upgrade means you get one more full sale per session.
Security Upgrade (~$351,000) — Buy Last
Reduces raid frequency. Raids only trigger above 50% stock capacity and only after extended periods as a CEO or MC President. If you sell at one supply bar — which you should — your stock never exceeds roughly 25% capacity. Raids will not happen. The Security Upgrade is optional for this strategy.
The Solo Sell Strategy: One Bar, One Vehicle
This is the rule that makes the Bunker solo-friendly. Learn it once.
One full supply bar → one vehicle. Always. Two or more bars → the game may give you two or three vehicles. Two or three vehicles + solo player + 15-minute timer = you are failing a sale and losing your stock.
The production flow:
- Buy supplies for $75,000 at the Bunker laptop
- Wait roughly 2 hours and 20 minutes for the supplies to convert to stock
- Sell the stock. One vehicle. Maximum $315,000 (far buyer) — $75,000 (supplies) = $240,000 net profit
- Buy supplies again
- Repeat
What to do during the 2 hour and 20 minute wait: anything. Run Cayo Perico. Do Payphone Hits. Empty your Nightclub safe. Sell your Acid Lab. Play contact missions. The Bunker produces in the background regardless of what activity you are doing. You do not need to be registered as a CEO or MC President. Production pauses only when you log out.
Sell Mission Types
Every Bunker sale is a vehicle delivery with one of five mission types. None are difficult if you sell one bar at a time.
| Mission Type | Vehicle | What Happens | Difficulty |
|---|---|---|---|
| Single Drop-Off | One truck | Drive to one location. Drop the cargo. Done. | Easy |
| Insurgent (Single) | Insurgent pickup | Drive to one drop. Fight a few Merryweather units. Done. | Easy |
| Monster Trucks | Marshall monster truck | Drive to 5 checkpoints. No enemies. Pure driving. | Easy |
| Dune FAV | Dune buggy | 5 drops. Awkward handling on roads. Go off-road instead. | Medium |
| Merryweather Insurgent | Insurgent with turret | Fight Merryweather at each drop. 5 stops. | Medium |
If you get the Dune FAV or Merryweather Insurgent, restart the game. You lose a small amount of stock — roughly $10,000 to $20,000 — but you save 10 to 15 minutes of frustration. The stock loss is cheaper than your time. This is not an official tip. It is just what solo players do.
Where the Bunker Fits in Your Rotation
Your solo money rotation, in order of purchase:
Phase 1: The Start
- Acid Lab → Bunker → Kosatka (Cayo Perico)
Phase 2: The Engine
- Agency → Nightclub → all five linked businesses
The Bunker sits between the Acid Lab and the Kosatka for a reason. The Acid Lab earns $500,000 per batch but produces slowly. The Bunker earns less per sale but produces faster and continuously. Together, they fund the $2.2 million Kosatka faster than either one alone.
A typical play session with Acid Lab + Bunker:
- Buy Bunker supplies ($75,000) — 30 seconds
- Buy Acid Lab supplies ($60,000) — 30 seconds
- Run Payphone Hit ($45,000) — 5 minutes
- Run Cayo Perico setup missions — 25 to 35 minutes
- Sell Acid Lab when batch is ready — 10 minutes, $500,000
- Sell Bunker stock when supply bar empties — 5 to 10 minutes, $315,000
- Buy supplies for both — 1 minute
By the time you own the Kosatka, the Acid Lab and Bunker are generating roughly $1 million per play session with roughly 30 minutes of active work. Everything else is waiting.
Common Mistakes
Mistake 1: Buying Paleto Forest because it is cheap.
You save $500,000 on the purchase. You lose hours of your life driving seven miles per sale. The cost per mile is not worth it. Buy Chumash. Do not negotiate with yourself on this.
Mistake 2: Selling at two bars to “save time.”
Two bars means two vehicles. Two vehicles means you need a second player or you are gambling. The timer on a two-vehicle Bunker sale is tight for one person. One bar = one vehicle. Accept this. Plan around it.
Mistake 3: Stealing supplies instead of buying them.
Steal missions fill 20% to 40% of the supply bar per run and take 5 to 10 minutes. $75,000 buys a full bar instantly. In the time you spend stealing two bars of supplies, you could have run two Payphone Hits for $90,000 and bought the supplies with cash left over. Buying supplies is mathematically correct for solo players with access to active income methods.
Mistake 4: Not selling to Los Santos.
The far buyer pays 50% more than the near buyer. On a $315,000 sale, the difference is roughly $105,000. The far buyer adds roughly 2 to 3 extra miles of driving. You are already driving. Drive a little further. Take the money.
Mistake 5: Assigning staff to both Manufacturing and Research.
This splits production. Half your staff makes stock. Half makes research progress. Both proceed at half speed. Pick one. For money: all Manufacturing. For weapon upgrades: all Research. Switching back and forth wastes production hours.
FAQ
Is the Bunker worth it after the July 2026 updates?
Yes. The Bunker was not nerfed in July 2026. Cayo Perico and the Kortz Center were the targets. The Bunker remains unchanged — $315,000 per full supply bar sold to Los Santos, same as it has been since the Criminal Enterprises update in 2022.
What is better: Bunker or Acid Lab?
Per sale, the Acid Lab earns more. But the Bunker produces more consistently. Honestly, the correct answer is both. Buy the Acid Lab first — it costs nothing to unlock and upgrades are cheaper. Use Acid Lab profits to buy the Bunker. Run them together. The full purchase order is in our beginner money guide.
Can I sell a full Bunker solo?
No. A full Bunker — five supply bars — generates up to four delivery vehicles. Four vehicles is impossible solo within the 15-minute timer. Do not attempt it. Sell at one bar only. If you have friends helping, you can sell up to two bars safely.
How do I move my Bunker to a better location?
Buy the new Bunker from the Maze Bank Foreclosures website. Your existing Bunker is automatically sold — you receive 50% of the original purchase price back. Upgrades are not refunded and must be repurchased for the new location. This stings. But if you bought Paleto Forest, do it anyway. The time you save driving from Chumash will pay for the loss within roughly 20 sales.
How much does a fully upgraded Bunker cost?
Chumash Bunker ($1.65M) + Equipment ($1.155M) + Staff ($598K) = roughly $3.4 million. Add Security later if you want it. Compared to the roughly $1 million total for a fully upgraded Acid Lab, the Bunker is a bigger investment. Compared to the roughly $5 million minimum for a Nightclub setup, it is a bargain. For the cost comparison across all businesses, see our best properties ranking.
I Did Not Buy Chumash the First Time
I bought the Paleto Forest Bunker. The listing said “$1.165M — Great Value.” It was my second week playing and that price looked like a discount compared to Chumash. Two months later I paid full price for Chumash anyway because I could not stand one more drive down the Great Ocean Highway with a Dune FAV that flips if you look at it wrong.
The $500,000 I “saved” buying Paleto cost me hours of my life. Do not repeat this mistake. Chumash is the location you want. Grab the Equipment Upgrade immediately. Start buying supplies from day one. Sell at one bar. This is the Bunker strategy. There is no secret trick beyond what I have written here. The business is simple. The discipline to sell small and stay patient is what separates players who own everything from players who burn out grinding.
The Bottom Line
The Bunker is your second business. It earns $240,000 net profit per supply cycle with roughly 5 to 10 minutes of active work. Combined with the Acid Lab, the two businesses generate roughly $700,000 to $800,000 per play session with under 30 minutes of combined effort. That funds everything else — the Kosatka, the Nightclub, the Agency, and eventually the Kortz Center Mansion.
Buy Chumash. Upgrade Equipment first. Sell at one supply bar only. Always choose the Los Santos buyer. Run the Bunker in the background while you do active money methods. When your empire is complete and you are sitting on $50 million, the Bunker is still printing money in the background. It never stops.
Check our GTA Online money methods guide for the complete rotation. The business to buy before this one is covered in our Acid Lab guide. Once you have both running, the Nightclub guide covers what comes next.
More GTA Online: GTA Online Money Methods 2026: Best $/Hour Ranked | Best Properties: Every Business Ranked F to S Tier | Beginner Money Guide: $0 to $2M in 2026 | Acid Lab Guide: Best First Business Setup | Cayo Perico Solo Guide: Post-Nerf Route & Payouts | Nightclub Guide: Max Passive Income Setup | GTA VI Ultimate Guide Hub
Sources: Bunker Complete Guide 2026 — Timesaver.gg | GTA Online Passive Income Business Rankings — CrimeNet Gazette | Bunker Sell Guide: Solo & Crew Strategies — OnlyFarms